Working with Linux and UNIX sudo
Sudo is a great security feature found in Linux and Unix. Linux and UNIX has a super user called root. Instead of providing users full root authority, sudo allows the system administrator to grant root access on a narrow scope.
Another administrative feature of sudo is event logging. The sudoers log provides a “paper trail” to show the user using sudo to perform root functions. If a user were to log in as root, it would be very hard to track the user issuing the root commands. However, with sudo the system administrator can see the use identification of the person issuing the root commands.
This scenario will examine providing a regular user with the ability to restart an Apache webserver on a CentOS 6.3 operating system.
- Log into the CentOS 6.3 system as root from a terminal. Type ssh root@(host name) and press [Enter]. Supply the password to complete the loggin.
- Create a user to set up in sudo unless there already is a user to set up in sudo. To create a user type useradd –u 1005 –g 100 –c “My User” –d /home/myuser –s /bin/bash –m myuser and press [Enter].
- Create a password for the user by typing passwd myuser and press [Enter]. Enter the password twice.
- Ensure the sudo package is installed by typing rpm –qa | grep sudo and press [Enter] (Figure 1).
![]()
Figure 1
- The sudo files are under the /etc directory. The file to edit is sudoers; however, do not VI the file but use visudo to edit the file by typing visudo and press [Enter].
- Add the user after the root user by typing myuser [Tab] (host name) = NOPASSWD: /usr/sbin/httpd and press [Esc] and type :wq! to save the changes (Figure 2).

Figure 2
- Log out of the server as root by typing logout and press [Enter].
- Log back into the server as the user created in step 2.
- Run the command without using sudo by typing /usr/sbin/httpd and press [Enter] (Figure 3).
![]()
Figure 3
- Now run the command with sudo by typing sudo /usr/sbin/httpd –k restart and press [Enter]. The command should just return to a prompt.
- Logs are generally reserved for root users, so type su – and press [Enter] and enter the root password. View the user’s activity in the secure log by typing tail –f /var/log/secure and press [Enter] (Figure 4).

Figure 4
- Now, to prove a point log into the server with the user’s name created in step 2. Type sudo init 6 and press [Enter]. The user is prompted for their password and when entered the user receives a permissions denied message (Figure 5).
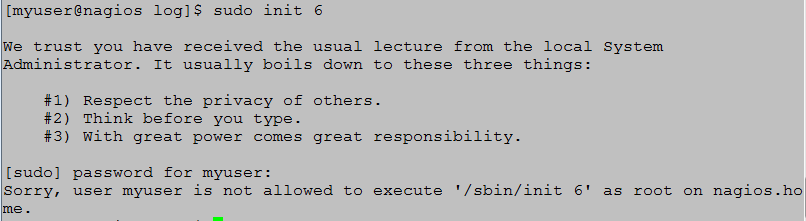
Figure 5
Since organizations have multiple users requiring the ability to work with Apache create a group. When Apache is installed a group called Apache is created in /etc/group. The group number is 48, so you can add the users to the apache group, then add the apache group to the sudoers file. This time give the group the ability to edit the files under /etc/httpd in addition to working with the Apache daemon.
- Log into the server as the root user.
- Add the user to the Apache group by typing usermod –G 48 myuser and press [Enter].
- Open the sudoers file by typing visudo and press [Enter].
- Go to the line with the wheel group and add the following line: %apache [Tab] (host name) = NOPASSWD: /usr/sbin/httpd, /bin/vi /etc/httpd/* , press [Esc] and type !wq! (Figure 6).

Figure 6
- Log out of the server and back in as the user added to the apache group.
- Restart Apache by typing sudo /usr/sbin/httpd –k restart and press [Enter]. The command should return to a command prompt with no errors.
- Test the file edit by typing sudo /usr/bin/vim /etc/httpd/conf/httpd.conf and press [Enter]. The httpd.conf file is now editable by users in the Apache group.
- To enable the apache group to edit any file in /etc/httpd change /etc/httpd/conf/httpd.conf to /etc/httpd/* . Now the apache group users can open any file under the /etc/httpd directory for editing.
All is well and good with sudo. The user and apache group can restart the httpd daemon and open the files under /etc/httpd for editing. A problem arises when a new server is added in addition to typing the full path to the command. Fortunately sudo has aliases to make life easier for everyone, but especially the system administrator.
Currently the new user needs to run /usr/bin/vim and /usr/sbin/httpd using sudo. Here is how to use aliases to abbreviate the commands.
- Log into the server as the root user.
- Open the sudoers file for editing by typing visudo and press [Enter].
- To take care of the commands go to the section with the ## Command Aliases.
- Since the commands already exist on the system the aliases need to be all capital letters. Add the following line:
- Cmnd_Alias [Tab] HTTPD = /usr/sbin/httpd and press [Esc].
- Go to the section in the sudoers file where the apache group was entered and change the path for httpd to HTTPD. Change the VI path to sudoedit (Figure 7).
- Save the file by pressing [Esc], typing :wq! and press [Enter].
- Log in as a user in the apache group and type sudo httpd –k restart and press [Enter]. Next type sudoedit /etc/httpd/conf/httpd.conf and press [Enter]. Both commands should work without asking for a password or throwing an exception.
Working with sudo is not hard and should be considered to limit the use of the root user on a Linux and UNIX server. For more information on working with sudo type man sudoers and press [Enter] on the Linux system or go to: http://www.sudo.ws/sudoers.man.html.
Enjoy!
