Securing a new and installed WordPress blog
Danger: Ensure to back up the WordPress database and files before making
any changes or installing updates to avoid website down time.
Danger: Do not use the same password and user name for administrator and
database accounts.
Tip: These changes are designed to help secure a WordPress blog. If you feel your website has already been compromised additional steps might be required to fully secure the website.
Securing a WordPress blog is an ongoing activity. Constant vigilance is required to prevent and intervene to secure the blog. While many of us work 8 – 12 hours a day, malicious scripts are working 24/7/365. These steps are not hard to follow and were actually implemented to an active WordPress blog.
- Ensure all WordPress updates are installed. The WordPress developers are constantly working to patch security issues. Subscribe to the WordPress security email list to be alerted when updated versions are deployed. If using a hosting plan log into the hosting account at least once a week to see if there are any security patches available for the version of WordPress you are running.
- Do not install ANY plugins unless they are needed for the blog. Plugin creators are only trying to help improve your viewer’s experience, but can provide an access route to the blog.
- Create a separate administrator account and delete the default admin account.
- Passwords should be complex and lengthy. There are two passwords to be concerned with in WordPress, the administrator account(s) and the database. The administrator password should contain upper and lower case letters, numbers, and special characters. The database password should contain upper and lower case letters and number. A source for creating passwords can be found at http://ebusinessjuncture.com/password_generator.php (Figure 1).
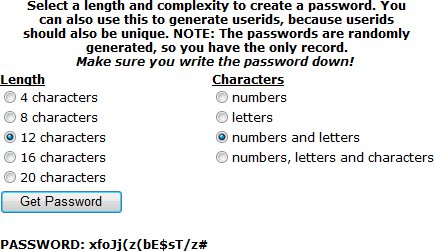
Figure 1
- To change the administrator’s password in WordPress, log into the blog with an administrator account. Select Users -> All Users. Mouse over the account name and the edit link will be visible. Click on the edit link. About three quarters of the way down the page you will see an area to reset the password. Enter the new password twice (Figure 2) and press Update Profile.

Figure 2
- Changing the database password is a little more complex.Tip: Changing the database base password will interfere with current users on the system, so plan on changing the password during a time when the least amount of viewers are on the system.The WordPress database password is stored in the wp-config.php file and the actual database. Log in to the hosting account. Open the FTP File Manager and drill down to the wp-config.php file. Select Edit and go to the MySQL section and copy the DB_NAME, DB_USER, DB_PASSWORD, and DB_HOST and close the file without saving the changes. Click on Database -> MySQL to obtain a listing of databases. Select the database listed next to DB_NAME and click on Actions -> Details. Under Password click Reset and enter the new password twice. Click Close and go to FTP File Manager and drill down to the wp-config.php file and open the file for editing. Change the DB_PASSWORD to the password set for the database, close the file and save the changes. If everything went according to plan the website should be visible when you go to the URL.Tip: Do not use copy-and-paste due to extra spaces at the end of the password and changes in characters. If you receive the error message: HTTP Internal Server error check the database password to ensure no illegal characters were used and the database and WordPress password match.
- To change the administrator’s password in WordPress, log into the blog with an administrator account. Select Users -> All Users. Mouse over the account name and the edit link will be visible. Click on the edit link. About three quarters of the way down the page you will see an area to reset the password. Enter the new password twice (Figure 2) and press Update Profile.
- Change the WordPress database table prefix. The default WordPress table prefix is “wp_.” Not too much of a problem except if the database is name WordPress. Now a hacker can try to insert unwanted scripts directly into the WordPress database tables. So as a precaution it is always best to rename the tables in the WordPress database to a different prefix.Tip: Changing database prefixes is not a beginner’s task. The procedure will be defined with as much detail as possible, but if after reading these steps you are not comfortable, then go to step number six.Danger: Ensure to back up the WordPress database and files before making any changes or installing updates to avoid website down time.
- Log in to the hosting account and launch the domain’s account manager (Figure 3).

Figure 3
- Go to Databases -> MySQL.
- Under the Actions dropdown box select Back Up and follow the procedures for backing up the database (Figure 4).
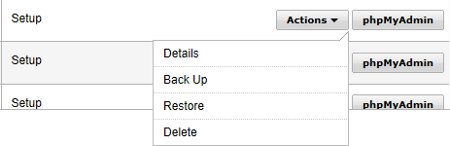
Figure 4
- Open phpMyAdmin and log in using the database user name and password.
- Expand the database to see all the tables. There are 11 tables by default (Figure 5).
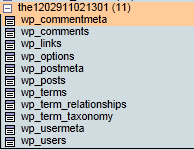
Figure 5
- Highlight the first table and select the Operations tab. (Figure 6).

Figure 6
- Within the box labeled Table options there is Rename table to. Change the wp_ to another value like mywp_ and press Go (Figure 7). Name the other 10 tables with the same prefix.
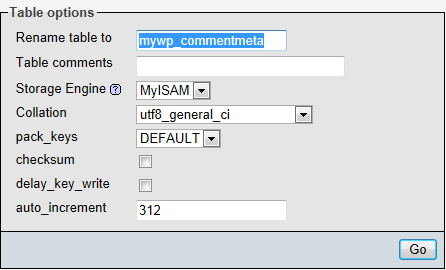
Figure 7
- Select the table mywp_options and click on the Browse tab. Look down the option_name column until you come to the wp_user_roles. Select the row for editing by clicking on the pencil and add the new prefix (Figure 8), then press the Go button to save.

Figure 8
- Select the usermeta table and click the Browse tab. Any value in the meta_key column with the wp_ prefix needs to be changed to the new prefix by clicking on the pencil. Press the Go button to save the changes.
- Close the phpMyAdmin window and the other windows until back down to the Control Panel.
- Click on the FTP File Manager and drill down to the wp-config.php file for the WordPress blog.
- Open the file by selecting it and pressing Edit.
- Scroll down until you come to the $table_prefix = ‘wp_’;. Change the prefix to the table prefix just added to the tables in the database (Figure 9), close and save the file.

Figure 9
- Log in to the hosting account and launch the domain’s account manager (Figure 3).
- Thoroughly test all aspects of the blog. Go to the URL to see if the website displays. Log into the WordPress blog using an administrator account. Any issues with the website go back to the beginning and check the changes again.
- Add a CAPTCHA plugin.
- Under Settings -> Writing consider if you really need the Post via e-mail feature before setting it up. Understand that it is difficult to keep any email address private today with all the sniffers on the Internet looking for passwords and email addresses.
- Under Settings -> Discussion check A comment is held for moderation under E-mail me whenever and An administrator must always approve the comment under Before a comment appears.
- Under Settings -> Discussion -> Other comment settings consider checking Comment author must fill out name and e-mail, Users must be registered and logged in to comment, and Automatically close comments on articles older than __ days.
- SPAM is hard to stop. WordPress has a couple of plugins that work very well; however, there will always be those that want to gain an edge in the link-back numbers game. Delete the SPAM and ensure you are receiving email when a comment is posted.
- Consider obtaining an SSL certificate for the website. The certificate can provide security for users creating an account and logging into the blog.
- A nice plugin to install is WP Security Scan. Allow the plugin to scan your WordPress website to see if there are any security issues.
- Avoid FTP and use SFTP or SSH. Although a hosting plan feature, some WordPress users use the same account for hosting and blog administration. If you do not have a choice but to use FTP consider changing the password after making changes.
- You can add a .htaccess to the wp-admin directory to prevent access to the wp-admin area except from specific IP addresses. Danger: If the file is not placed in the wp-admin directory or folder you can lock yourself out of the admin area.
- Back up the WordPress website and database on a regular basis. If there is a security breach you will at least have a restore point until you find the breech and clean up the database. A good book to have for backing up WordPress is Creating Free Backups of Hosting Plan Websites and Applications the book is affordably priced and in PDF format.
I hope this helps with securing your WordPress website. Remember security is on-going and requires vigilance. Figure about four hours a week to create posts, check comments, and look for security issues.
